Monday, February 28, 2011

Altered Magnolia Tilda in the Garden Clipboard

Good morning and happy week. Well at least so far my week is not too bad, so I assume my week is happy, lol. Today I am showing you an altered project. I've never made an altered clipboard but always wanted to try one. The other day, when I went to a dollar store, I saw a clipboard, so it gave me the idea on trying one out, so I did! This one I used Tilda In The Garden from Magnolia-licious. Because this clipboard is to lay under paper for writing, I don't want to put too much dimension.

The clipboard is longer than 12 inches, so DP is not long enough for this, so I just cover the side and cut another piece of DP to cover the top part of the board. You see this narrow pink strip on the top part? That is to cover the gap between the two DPs.

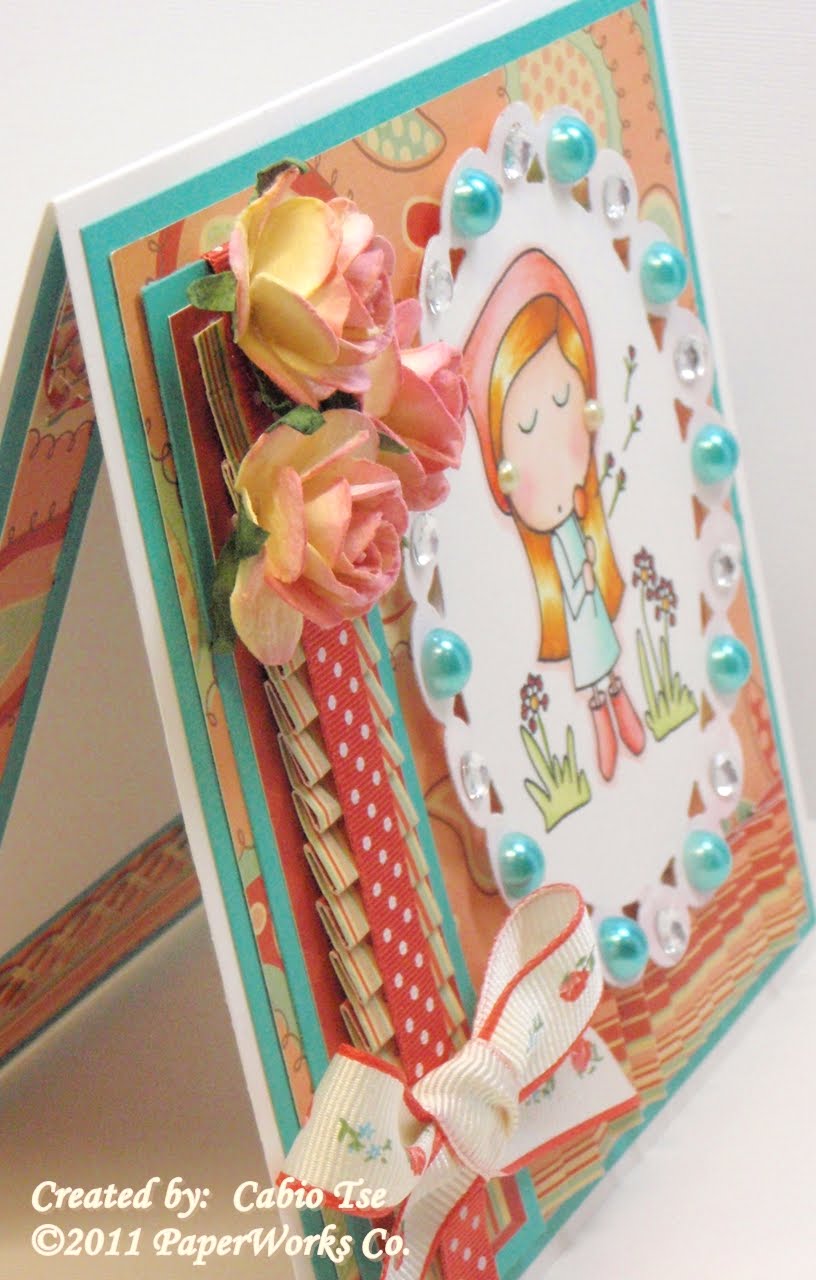
Since I wanted to make a cheerful clipboard, I went to my pattern paper stack to look through and found these colorful and cheerful DP and here is my finished project. After I finished adhered the whole piece together, I paint a few coatings of "Mod Podge" to add some glossy effect on top yet to secure the adhered DPs, punched borders, and the image.

Here is my completed project and I am using this for the following challenges:
The Cheerful Stamp Pad Challenge #12 - anything but a card
I Did It Creations Challenge #43 - Punches or Dies
Flashback Friday Challenge 8.0 - 3D project
DYSU Challenge #8 - Anything Goes
PCJ Challenge #4 - Anything Goes
Craft Your Passion Challenge #47 - Girly girl
StampFairy Challenge - Anything but a card
Woodward USA Challenge #16 - Anything Goes


Closer view on this Tilda image.


Closer view on the clip, I tied some coordinating ribbons to match up some of the DP's colors. I went to Michael's the other day and saw a package of metal butterflies from the Recollection embellishment section.


Not sure if you can see it better on this picture, but the whole clipboard was brushed with coatings of Mod Podge to seal the image and DP.


Copics info:
Skin - E21, E11, E00
Hair - 100, C6, C3, C00
Clothes - Y38, Y17, Y15, Y00, YR24, W3
Flower - R59, R14, R02, G40, G99, FV2
Socks - R02, R11, R00
Shoes - E59, E37, E33, E00

Thank you so much for stopping by and hope you like what I prepared for you today :o)

Saturday, February 26, 2011

CAS Valentine's card made from PWCO monthly kit

Good morning everyone and happy Saturday. I wondered how many of you have purchased the PWCO monthly kits from Peg. I found that there are so many different coordinate DPs that come with them. The material to use for today's card is from one of Peg's monthly kit. The even better think is that this kit contains so many pink & brown which I love. What a sweet combo. Of course with the sweet coloring, I tended to choose a sweet/love feel of stamp. This card is made with the monthly kit plus the My Valentine stamp of the PWCO/RAM exclusive stamp.


Here is my finished card using part of the PWCO monthly kit. I am also going to use this card for the following challenges:
Stamping Scrapping Challenge - Pink Challenge
Incy Wincy #82 - Use Punches or die cut
OLLCB Challenge #7 - pink pink or more pink
The Sisterhood of Crafters - Ribbon and Brads
Crafty Calendar Challenge #17 - Love
Little Claire Challenge #1 - Anything Goes


Closer view of this sweet image


Side view of this card


A flat view to show you the dimension of this card


Stamp: PWCO RAM - My Valentine

DP: PWCO Monthly Kit

Ink: Memento, Copic Markers

Accessories: MS border punch, ribbon, brad

Hope you like this card and please be sure to check out other DT's wonderful projects often by clicking their name under the sidebar of the PWCO's blog.

Thank you for stopping by today and see you soon :o)


Monday, February 21, 2011

Magnolia-licious Inspiration Challenge - Pink & Brown & Baby???

Hello everyone!! It has been a fun color challenge over at Magnolia-licious Challenge with the Black, Pink & Red these past couple week. Now we are on the new challenge for an Inspiration challenge. Again, our sweet TRACY's turn and she picked us the picture below for this challenge. This baby room picture is filled with pink & brown. At first, I really have no clue on what I should make, but soon I got an idea.


For the projects I made with this picture is a shape easel card with a baby carriage. For the shape card, I used the TILDA WITH HANGING HEART stamp from Magnolia-licious Store and for the baby carriage, you can find the TUTORIAL FROM HERE.

I am also using this project combo for more challenges (please scroll down to the bottom of this post)

Here is my finished shape easel and the little baby carriage. I think it will be very cute to add a little face cloth inside the carriage as a baby gift!!


A closer view on this cute image


Side view of this card


A flat view to show you the dimension of this card


Closer shot of this baby carriage. I think it would be great to put a little baby cloth inside as a gift.


Front and back view of this carriage


This card project is also for the following challenges:
Truly Scrumptious Challenge #51 - Swirls & Pearls
Bearly-Mine Challenge Challenge #4 - Ribbons and Pearls
Get Funky - Show us your heart
Scrapbook Sisters Challenge #23 - baby baby
C4C75 - Use dies
Wag 'n Whiskers Challenge #48 - Punches
Crafts and Me Challenges - Time to Spread Your Wings
4 Crafty Chicks Challenge #25 - Fairy/Angel/Butterfly
Die Cut Dreams Challenge #83 - It's a girl (Baby)
My Sheri Crafts Challenge #45 - All about Girls
Pile It On #8 - Childhood Dreams
PWC141 - Create a Card for a Child

Thank you for stopping by today. I hope you will have fun looking at this project combo and don't forget to visit the challenge blog to see other DT's project for more inspirations. Hope to see you joining us and have fun :o)

Thursday, February 17, 2011

PWCO Side Step Valentine's Day card

Today, I am going to post a fun side stair step card. I haven't do a side stair step card for a while and I have this set of Little Loud Stamp's Freckle Love Collection from PaperWorks Co. that I really wanted to play with. It's a great time for you to check over those stamps now as they are now 40% off from PWCO. I combine the two stamps Jacob the Cupid and Standing Beneath a Tree on this card. Love the turn out of this little outdoor scene.

I am also using this card for the following challenges:
The Pink Elephant TPE93 - Be my Valentine
Stamps R Us Challenge #14 - Valentine/Love
Let's Ink it Up challenge #9 - Romance/Valentines Day
Stamp, Scrap & Doodle Saturdays - Love is in the Air
Totally Gorjuss Challenge #67 - Love
C4C74 - Hearts
One Stop Craft Challenge Week #118 - Love is in the Air
Stamp Something - Something for your Valentines
Stampin Royality Challenge #59 - Mark it up

Here is my finished card.


Closer view of these images


Side view of this card


Here is a view taken from the top, so you can see what the inside look like


Thank you for stopping by today and see you again soon for more project sharing :o)

Tuesday, February 15, 2011

DIY Foam Board Copic Storage & how I take my blog post pictures

Good morning everyone. I can't show you this post today. It's my foam board Copic storage. I do have a storage, but as my Copic markers' collections growing, it gets so tight and crowded, so, I was starting to search for another solution for them. Thank you for Jennifer's sharing!! She is the one who posted this foam board Copic storage and she even posted the instruction. So if you are interested to make one, please visit JENNIFER'S BLOG for the instruction.


This foam board cost about $8.00. All you need is a few foam board, a cutting knife and glue gun. How simple is that?! I love it as it is big enough for my markers and it even gives spaces for refills and ink pad, etc.

Next, I am going to show you a picture on how I take my blog post pictures. I know some of you use a light box or use some DIY light box with tissue paper. For me, I use 3 lights and turn off my camera's flash (most of the time).

As you can see the picture below, I bought the 2 desk top florescent lights from Costco and I also put a bigger florescent light that I bought from Vancouver a long time ago. Just lay my projects on pieces of white stock.

Here is the picture showing you while I was taking pictures for THIS BLOG POST.


This is the picture I took.


Thank you for stopping by today and please come back again soon. Hope you feel inspired from today's posts. See you soon!!

Saturday, February 12, 2011

PWCO Wool ewe love in Valentine's

Happy Saturday & happy early Valentine's Day. It's been a heart mood for me lately and can't stop doing projects with hearts. This time, I would like to share with you another card with some hearts. If you didn't get a chance to check out the PWCO's RAM Collections. I guarantee you will see lots of fun images there.

This image is called "Wool Ewe" from the RAM VDAY Collection. See lots of hearts here, lol. I punched out squares from my stash box, and then I lined them all up to form a little 'quilt' background. After then, I embossed the pink & red cardstock and punched some heart shapes out to lay them around the card. See the crochet flower accent? Hehe, I made it myself. To tell you the truth, I know how to knit but don't know how to crochet other than 'chain' stitches. I was brave enough to try playing with it on a weekend and without a pattern, or instruction on how many stitches, don't ask me how, but I did it and made a small and a large flower and thread them together, then sprayed them with Glimmer Mist. Not sure if I will do it again, but it was great fun!!

I am also using today's card for the following challenges:
Crafty Ann's Challenge #35 - Love is all around
Crafty Catz Weekly Challenge #69
- Valentines/Love
Fun with shapes and more Challenge #76 - of heart with heart
The Stamp Man Challenge #16 - Hearts Theme
Stamp Something Challenge - Something for your Valentine
CCEE106 - Embossing
Cute Card Thursday Challenge 151 - Hearts & Flowers
Crafty Ho's Challenge 2/6 - Love Theme
CRAFT Challenge #89 - Valentines
Delightful Challenges - Get Punchy

Here is a closer view on this card

Closer view on this cute Wool Ewe stamp


Ok, please don't laugh, but I really did this crochet flower all by myself, then sprayed it with Glimmer Mist, and added a mini flower with rhinestone in the middle. I am not sure if I can make more, but maybe someday, I will try to make them again. This will make a great embellishment.


Side view of this card

Flat view to show you the dimension of this card

Cardstock - Bazzill

Ink - Copics

Embellishment - embossing folder, trim, mini bow, rhinestone, mini pom pom

Thank you for stopping by today and hope you like what I prepared for you today. See you soon :o)

Friday, February 11, 2011

PWCO's Blog Hop of the New Collection for February 2011

Welcome to the PWCO's new release of "A Day in the Life of Abigail C" Collection Blog Hop. You got to check out these fabulous stamps from the shop. They are SOOOO CUTE!!! Before I go on, if you are coming here from our fabulous DT Danielle's Blog, you are in the right track. If not, please start this blog hop from Peggy's blog. For your information, I attached the blog hop list below:

Ok, now off to my projects for today. I prepared a couple projects with some of these stamps from the new collection.

My First Project - Card using "HE LOVES ME?". Since there are only a few days away from Valentine's Day, I wanted to use some sweeter color, so I picked peachy pink with a contrast of aqua.
Here is my complete card and I use a stripe of coorindating DP to fold pleated ribbon and used them on the layout here.


Here is a closer shot of the cute image and a closer shot of the folded pleats paper strip. I added a piece of polka dots ribbon on top.


Side view of this card


View of the inside. I can't help not to do the inside with the contrast DPs.


My First Project - Card using "ABBY EASTER"

I am actually using this week's PWCO Sketch as my base of this layout. Since this image is about Easter eggs, I just make an Easter theme card with some rich coloring.


Closer view of this image


Side view of this card. I added the loose flap rather than adhered it on the card.


Top view to show you the front flap on this card.


View of the inside. I added some Jolee's embellishment to follow the Easter theme.


Information for these cards:
Cardstock: Bazzill
DP: My Mind's Eye, Basic Grey
Embellishments: stickle, flowers, Jolee's stickers, Pearls, ribbon, Nestabilities, MS border punch

Hope you have fun hopping around and have fun!! Now your can continue your NEXT HOP to another talented DT NICOLE'S BLOG and see what beautiful projects Nicole have for you. Thank you for stopping by and good luck!