Tuesday, November 29, 2011

Magnolia Sitting Tilda with Teddybear Gift Box Tutorial

Good morning everyone and thank you for visiting today. As mentioned from the previous posts HERE and HERE, today is the tutorial of this gift box which measured 5" X 5 1/4".


Materials you need, some are optional:

Stamps - Sitting Tilda with Teddybear from Magnolia-licious
Sentiment - Inkadinkado
Cardstock - 6" x 12" (1 piece - for box base)
Some scraps for the back layer for the sentiment on cover (see yellow border punched piece from picture above)
Patterned paper -
Cover and back - Magnolia Sweet Rainbow Paper Pack - 5" x 4 3/4" (2 pieces)
Border - Magnolia Winner Takes It All - 4 3/4" x 1 1/4" (4 piece)
Embellishments (Optional) - Flower, ribbon, brads, pearl swirls, butterfly punch outs, pearls
Tools - Scor-Pal, Scor-Tape, Sizzix Big Shot, Martha Stewart border punch, Cuttlebug Embossing Folder, Scissors, Paper glue, Spellbinder die cutter (to cut out shape piece the for back layer for the sentiment - optional).

*****TO FORM THE BOX*****
With the 6" x 12" cardstock, short edge across the Scor-Pal on top, score @ 1/2", 5 1/2"


Turn the piece 90 degrees to have the long edge on top, score at 1/2", 1", 6 1/4" and 6"3/4"


After creasing all the score lines. On the long sides, cut slits on each score lines up to the point where they connect with the first score lines from the long side.

Cut off (remove) the small square pieces like the picture below

Turn over so the cover is facing the top. The picture below shows the left part of the cardstock piece is the back cover and the right part is the front cover when it is assembled.
Apply Scor-tape to each side edge of the back cover. Apply small pieces of Scor-tape to the little part (as picture below) to each small square side of the front cover.


Fold the front cover flip up, then adhere the corners to create this flip lid for closing. Here are the two pictures. On the second picture of this section, you can see a closer view on how to adhere it to form the flip lid.


This is what the cover flip looks like when it is assembled.

Next step is to adhere the left & right side edges together to form it into a box shape.


This box is basically completed and you can push the flip lid down to close this box.

*****TO DECORATE THE BOX*****
I like to add some textures on the cover. The patterned paper is 5" x 4 3/4". However, the Cuttlebug Embossing Folder is smaller than this piece. Open up the embossing folder, with the long edge of patterned paper across the top, lay it inside the embossing folder. The side edges will stick out (but don't worry, it will get covered up by the punched borders later).

Put it through the Sizzix/die cut machine.


This is what the embossed patterned paper will look like. As you can see the top & bottom edges are flat since this patterned paper is bigger than the embossing folder.


Punch one side edge of each 4 3/4" x 1 1/4" piece with the Martha Stewart punch.

Adhere the borders to top & bottom edges of the back & front cover.

Here is the view of the finished back cover


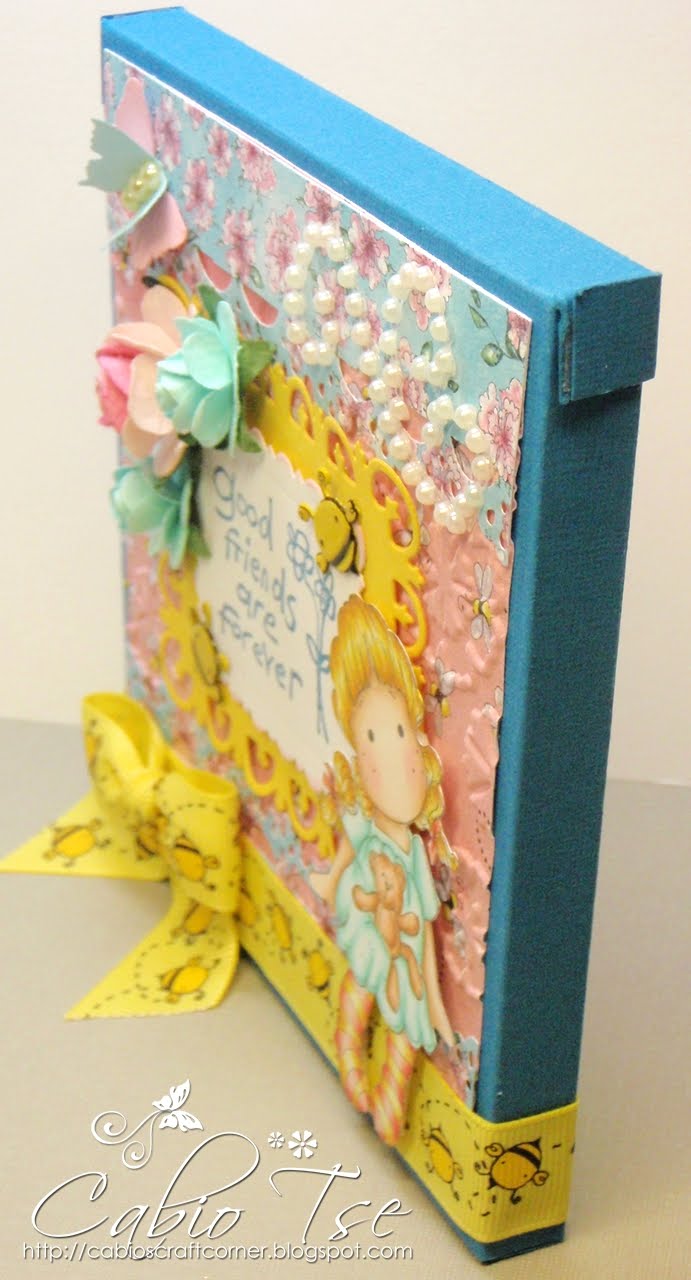
You do the same piece on the front cover. Apply the Sitting Tilda with Teddybear image and sentiment on the cover, then add any embellishment as you wish. I hope you enjoy this tutorial and have fun trying it out. If there are any questions, you can add it on the comment section with your email address.

Thank you for stopping by and hope to share more projects with you soon :o)

Monday, November 28, 2011

Magnolia Sitting Tilda with Teddybear Friends Forever Box

Good morning everyone. Today's project is another box. (TUTORIAL OF THIS BOX WILL BE POSTED TOMORROW) The original blog post on the box was HERE. For this box, I picked the Sitting Tilda with Teddybear from Magnolia-licious Store as focus of this project. For those of you who would like to see tutorial of this box, I will post tutorial of this box. Please come back again tomorrow if you are interested on learning how to make this box.

Here is the finished project.

I am using this project for the following challenges:
Creative Inspirations Challenge - Anything but a card
Secret Crafter Challenge 162 - Borders & Flowers
Stampin for the week Challenge 21 - Friends
Sweet Stampin Challenge - Punches Dies
Inspired Me Friday 34 - Anything Goes
Moving Along with the Times Challenge - Ribbons and Bows
Cooking It Up #85 - Recipe (Use a punch, add some ink, including some embossing)

Closer view of this cute Tilda. She is colored with Copic Markers and Prismcolor Premium Color Pencils

Closer view of some of these embellishment


Side view of this box


View of the back

Flat view showing you the dimension of this box


Thank you so much for stopping by and please come back for the tutorial tomorrow :o)

Monday, November 21, 2011

Tilda Tags Holder for Magnolia-licious Inspiration Challenge

Good morning and the project I share with you today is the DT project for Magnolia-licious Inspiration Challenge. Our talented DT member PAT is this month's host for our challenge and she picked the following inspiration picture for the challenge. You can refer to the picture below and create something to join us along. You can be one of the lucky random draw winner to get a $25.00 from Magnolia-licious.


From the above picture, I made a Christmas Tags Holder. Here is my finished project. This "Match box" holder holds 5 circle tags. I used a combination of a regular size Sweet Christmas Tilda and 5 mini Tilda stamps Unwrapped Tilda, Wrapped Tilda, Singing Carols, Tilda with Big Ribbon, Christmas Morning Tilda, plus the Christmas text background Sentiment from Magnolia-licious Store.


I am also going to use this project for the following challenges:
Bunny Zoe's Crafts Challenge 18 - Anything Christmas with Pearls
Dutch Magnolia Lovers Challenge 20 - Back in Time (Christmas)
My Partner in Crafting Crime Challenge 36 - Christmas Tags
Paper Creations Ink Challenge 13 - Christmas theme
Pollycraft Monday Challenge 120 - Christmas Fun
Bows and Berries Challenge 14 - Tags
Make It Monday - Anything Goes
Lollipop Crafts Challenge 58 - Anything Goes
Just Some Lines Challenge - Tic Tac Toe (Embossing, Ribbon, Punch/die-cut)
Card and Scrap Challenges 20 - Traditional Christmas color
Paper Crafting Journey Challenge 23 - Embossing
Delightful Challenges - Bingo (Tag, Ribbon/lace, Punches/die cuts)

Closer view of this regular size Sweet Christmas Tilda and the Christmas Text Background which stamped on the Vintage Tag Doohickey Cutting Die . I embossed the die with the snowflake Cuttlebug embossing folder. In fact, I embossed almost the all the pattern paper on all pages of this match book.


Closer view of these mini stamps
Link

Here is a view to show you when his match book tag holder when it's opened. I used the 3 1/4 x 3 1/4 mini envelopes to create the pockets and put embossed DP on top of them, then adhered them on a piece of accordion piece of cardstock. Then created a cover to wrap the pockets to create a match book.


Here is a wrapper of this holder


Here is the side view when this holder is closed with the wrapper


And when the holder is closed and the wrapper is removed.


Top view to show you what the inside of this tag holder looks like.


Back view of this holder.


I hope you like this project I made and hope you can join us along to create a project (can be a card, 3D or altered project). See you soon :o)

Sunday, November 20, 2011

Sweet Christmas Dream Winter Tilda Ornament Box Set

Good morning everyone. Today, I would like to share a picture as well as a project with you.
Being a Magnolia-licious Challenge Blog DT for one year, plus in a close enough area, I finally got a chance to meet up with our wonderful Magnolia-licious Owner DIANA and the lovely DT Leader CANDY. Thank you ladies for a fabulous afternoon :o) There is also NORMA too, this time I missed her, but for sure next time I definitely will get together with her.

Here is the picture we took in our lunch date. Diana on the left, Candy & myself (in white hoodies) on the right.


My project today:
My project to share today is a Christmas ornament set (thank you for the inspirations from my talented Magnolia-licious fellow DT member Angela from her blog post HERE. Instead of putting it into an envelope, I made a box to put the ornament inside. This ornament was made with the WINTER TILDA from the SWEET CHRISTMAS DREAM COLLECTION from MAGNOLIA-LICIOUS. I might do a tutorial on how to make the envelope box sometimes later :o)

These are the finished set. I made a total of 4 sets so far.


I am also using this project set for the following challenges:
Bah Humbug Challenge 45 - Bags or boxes
Fussy and Fancy Challenge 50 - Anything but a card
Stamp, Scrap & Doodle - Embossing
Fabulous Friday Challenge - Die Cuts
Crafty Ribbons Challenge 6 - Anything but a card

Here are the ornaments I made. I am planning to make more when I have more time.

Here is the close view of the ornament.

Closer view of the images.


Closer view of the snowflakes with gems embellishments.

Flat view to show you the dimension of this ornament.


Here is the box I made to fit the ornament inside. This finished box measures 5" x 5 1/4". The thickness of this box is 1/2" deep.

Back view of the box.


Side view of this box


Closer view of the front of this box.


Thank you so much for coming by and hope you enjoy today's post :o)